5

How To Teach Your Dog To Roll Over
Since I published my core training concept, “The Four Stages of Luring,” many people have asked me to show them examples of how luring is done. And because a picture speaks a thousand words, I decided to dig into my collection of dog trick lessons to find one that uses this training method.
Then I stumbled upon my “Roll Over” lesson—the perfect match!
Here’s the video—it’s only about six minutes long and you’ll learn exactly how to teach your dog to roll over.
You will also find some additional information below about each stage so you can refer to it while teaching your dog this trick.
STAGE 1
The first thing you need to do is teach your dog the behavior of rolling over. Begin by luring your dog into a down position. This is accomplished by moving your lure close to the floor and between your dog’s paws. Be sure to release the treat and reward your dog once its belly touches the floor.
Then the next step will be to reward your dog for going onto its side. At this stage you move your lure close to your dog’s shoulder blade. Make sure you release the treat and reward your dog once it falls onto its side.
Continue to move your lure closer to your dog’s back until your dog rolls over. You may need to reward this step multiple times before your dog gets used to the sensation of rolling over. Depending on the size of your dog, you may need to create some momentum by quickly moving your lure toward your dog’s back.
This momentum, as demonstrated in the video, will get your dog’s body to follow through and roll over.
Please keep in mind that rolling over is not a natural behavior for dogs and can be a little bit scary for them. It’s also recommended that you practice this on a soft surface such as carpet or grass. This will make it more comfortable for your dog.
STAGE 2
Once you can easily lure your dog to roll over, the next logical step is to teach your dog to respond to a hand signal. You might be wondering why you need to teach a hand signal. The main reason is to keep your dog from becoming dependent on your having food in your hand to perform the behavior.
Begin by creating a pattern in which you lure your dog twice in a row for rolling over. On the third repetition, simply pretend you have a treat in your hand and do the same motion. This will fool your dog into following your hand even though you don’t have any food in it.
As you become successful at this, you can reduce the ratio of lures to hand signals until it is 1:1, meaning that you lure your dog once and then give a hand signal. Eventually, you will be able to entirely phase out the lures.
Then you can gradually make changes to your hand signal until your dog responds to the one that you want. For example, you can practice signaling your dog to roll over and, with every repetition, you can slowly stand.
STAGE 3 & 4
Did you notice that I didn’t give the command “Roll over” until this stage? The reason I didn’t is that dogs need to learn the behavior before it can be associated with a verbal command.
And because you’ve just taught your dog the behavior in the first two stages, the only thing left is to give your verbal command, “Roll over,” just before you give your hand signal.
Pretty easy, right?
The trick for this to work is repetition. You have to do it a good twenty to thirty times, preferably over a few training sessions. Then you’ll want to attempt Stage 4, which consists of saying your verbal command.
It’s also a good idea to create a pattern in which you give your verbal command “Roll over” two or three times in a row, and then test your dog’s understanding on the following repetition.
CONCLUSION
I must admit I have an affinity for this trick. It was one of the first tricks I taught my dog, and it gave me such a sense of confidence.
So have fun with it!
NOTE: And be sure to refer to this guide while you go through the different stages with your dog. There is also great additional information inside my core training concept, “The Four Stages of Luring.”

Dog Training Infographic Version 2 – The Four Stages of Luring
I published my long-awaited training concept about the four stages of luring a few days ago. You can learn more about how it works and how you can use it to train your dog on this page.
When I designed this infographic, I wanted two distinct versions. The first one was to be given to my students so that they can print it and refer to it while training their dog.
The other was to be a graphic-oriented infographic, where people could share it on social media sites such as Facebook and Twitter, or post it on their website.
Here is the second version:
(Click the photo to enlarge, and check out the sharing instructions at the bottom of this page.)
Share this image on your site:
[infographic_share_1]Share this image on social media:
[social_sharing style=”style-14″ fb_like_url=”https://www.successdogs.com/jeans-blog/dog-training-infographic-luring/” fb_color=”light” fb_lang=”en_GB” fb_text=”like” fb_button_text=”Share” tw_lang=”en” tw_url=”https://www.successdogs.com/jeans-blog/dog-training-infographic-luring/” tw_name=”successdogs” tw_button_text=”Share” g_url=”https://www.successdogs.com/jeans-blog/dog-training-infographic-luring/” g_lang=”en-GB” g_button_text=”Share” alignment=”center”]If you would like to download the printer-friendly version, visit the four stages of luring training concept page.
7

Training Concept: The Four Stages Of Luring
In this post, I’m going to discuss in great depth the four stages of luring, a common training technique to get your dog to do a specific behavior such as sitting, lying down, or rolling over.
Luring is extremely easy and will work with any dog that is food motivated. You place a piece of food inside your hand and position it next to your dog’s nose. Because your dog will want the food, it will begin to sniff your hand. While your dog is interested in the food, you can move your hand in different positions to prompt your dog to get into a certain position.
For example, you can move your hand upward and toward your dog’s ears to get it to sit or move your hand down and toward its paws to get your dog to lie down. It’s a useful technique available to anyone wanting to train a dog by using positive reinforcements.
However, it does have its limits. You cannot use luring to counter-condition an existing behavior such as barking or pulling on the leash. And you cannot use it to teach your dog an intricate behavior such as playing chess or retrieving a ball.
Luring is the first technique I learned to train my dog with. I learned it while attending dog training classes here locally. And I will never forget the moment when I was finally able to communicate what I wanted to my dog. So that my dog learned to instantly respond to my “sit,” “down,” “stand,” and “get in” commands.
In fact, here is a short video of those four behaviors taught using this technique:
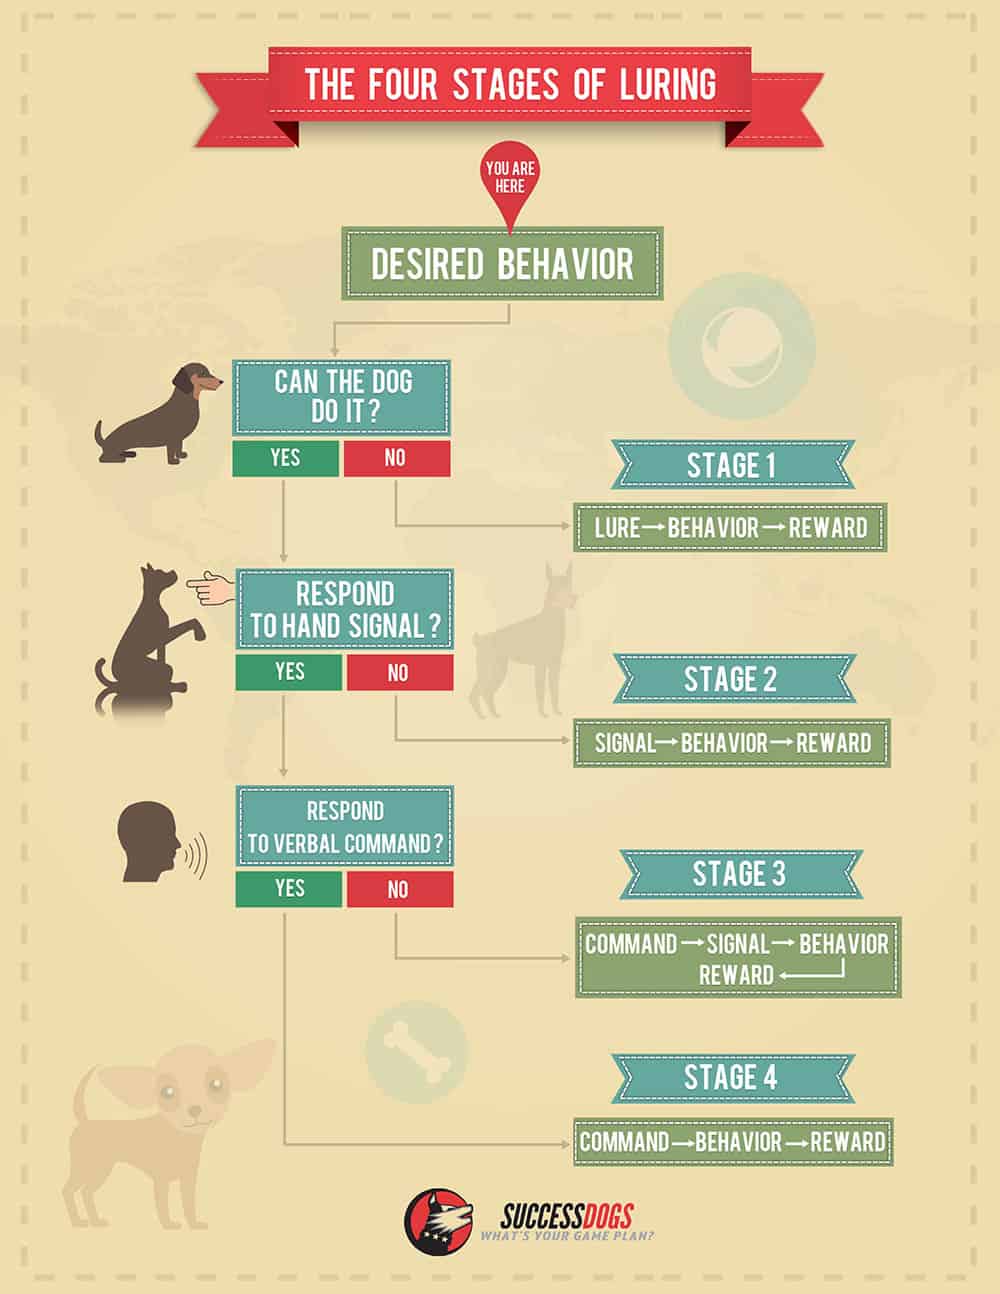
THE DIAGRAM:

I created this diagram to help you understand more clearly luring process and how you can get to the point where your dog responds to your verbal commands.
The first step, as indicated by the “YOU ARE HERE” marker in the image above, is the behavior you want your dog to do.
Whenever you use this diagram, you must think about one specific behavior you want to train. This is what I call the “desired behavior.” Then you go through the questions on the left, and if any of the answers is “no,” then this is the stage you need to work on.
I will explain each stage in detail below.
STAGE 1:

Once you’ve figured out exactly which behavior you want to work on, then you must ask yourself the first question: “Can the dog do it?” This question is in relation to your ability to lure the dog into that position. For example, if your desired behavior is getting your dog to sit, well, every dog is able to sit at some point. But can your dog do it in relation to the lure? The question really should be, “Am I able to consistently lure my dog into this position?” but it didn’t fit inside the diagram.
So if the answer is “no,” then this is where you need to begin.
You will need to pick a food that your dog absolutely loves, something that it only gets as a treat, like a piece of chicken or sausage. Then place this food inside the palm of your hand and close your hand like a fist. Your dog will be able to smell the treat but won’t be able to eat it.
And the way this stage works is this: You move your hand while your dog is sniffing it. This is essentially what luring is. Because your dog is trying to get to the food, it will follow your hand. Your goal here is to move your hand in a way that gets your dog in a particular position.
So, for example, if you wanted to get your dog to sit, you would move your hand upward and toward your dog’s ears.
Now, the secret for this to work with your dog is all about when you release the treat. This is what is going to communicate to your dog: Whatever behavior you just did is what earned you this treat.
So to reward the sit, you would immediately open your hand and give your dog the treat after its behind touches the ground. And when you do this over and over, your dog will quickly learn that the fastest way to get the treat is to sit down.
There is also the option of giving a marker signal once your dog gets into the desired position. A marker signal can be either the word “yes” or the sound of a clicker. In this stage, a marker signal is not needed because releasing the treat once the dog gets into the desired position is enough for a dog to understand what you want.
STAGE 2:

Okay, it’s time for the second stage. This is where you teach your dog to respond to a hand signal. You need to teach your dog a unique hand signal for every specific behavior. For example, sitting is an upward motion with the palm of your hand facing upward.
Teaching your dog a hand signal has numerous benefits, the main one being preventing your dog from becoming dependent on you having a treat in your hand for it to do the behavior. Another reason is that you want your dog to learn your body language so you can communicate at a distance.
I remember when I taught my dog Onyx to respond to all of my hand signals for the obedience behaviors. She would lie down, sit, stand, come, and sit at my side without me ever having to say anything. I thought it was the coolest thing ever.
And this is why I love this stage so much: You are effectively communicating with your dog with just the use of your body. Dogs are extremely visual, and they can notice the slightest change in your physiology.
To teach your dog a hand signal, you will have to do it gradually because if your dog is used to following a lure, and all of sudden you use a hand signal, your dog is not going to understand.
That’s why you must first create a pattern so your dog will be successful. This is done by luring your dog three times in a row (the same way as described in stage one). Then, on the fourth repetition, take the food out of your hand and move your hand the same way as a lure.
This works well because you’ve just rewarded your dog three times in a row for getting into the position. And your dog is smart; it will anticipate that you want the behavior repeated. So even though there isn’t any food in your hand, your dog is still going to do the same thing.
This is what is called a 3:1 ratio; you lure your dog three times in a row, each time followed by a hand signal. Then continue practicing until you can lower the ratio to 2:1, then 1:1 and, eventually, you phase out the lures altogether.
What is important to note here is that this is a gradual process; it won’t happen overnight. You need to make sure your dog is successful. If you try to give your dog a hand signal over and over, and the dog fails, you’re both going to become frustrated. That’s why you have to take it one step at a time.
From my years of experience teaching hand signals, I would like to share one more key distinction with you. Whenever you give your dog a hand signal, and it responds by doing the behavior you want, you should always bring your treat to your signal hand before giving it to your dog. This will keep your dog focused and attentive to your signal hand because that is where the treats are.
Once your dog consistently responds to your hand signal and is no longer dependent on the lures, you will want to move on to the next phase, which is to refine your hand signal.
For example, a hand signal in the beginning might look more like a lure with the hand closed and close to the dog’s nose. But then you will want to make refinements to that hand signal and open your palm and face it in a certain direction.
What you want to do is make one small change at a time. Once your dog is successful, continue refining your hand signal. You can continue doing this until you have the perfect hand signal you want. It’s totally up to you.
You will also need to do the same thing with distance. Begin with a hand signal next to your dog’s nose and gradually increase the distance until you are a foot or two away.
STAGE 3:

This might surprise you, but did you notice that I didn’t mention anything about a verbal command in the first two stages?
The reason is that dogs have no idea what a verbal command means until it’s been associated with a certain behavior. In fact, dogs don’t understand the commands “Sit” or “Down.” You could train your dog to sit when you say “Banana” if you wanted to. The word itself is meaningless.
The way dogs learn a verbal command is through repetitions in which the dog learns to offer a specific behavior after hearing the command in order to get the reward. It’s that simple.
And I have some great news. Most of the hard work is done in the first two stages in which you teach the dog the behavior and the hand signal. Once you can consistently and easily signal your dog into a position, then all you have to do is say your verbal command just before giving your hand signal.
Here is an example: In stage two, you would begin by giving your dog the signal for sitting. Then your dog would sit. And then you would give it a treat.
Now all you have to do is say “Sit.” Then give your hand signal and, once your dog sits, you give it a treat. Your dog will learn through repetition that every single time you give your verbal command, the same hand signal is given afterward. Eventually, your dog is going to start doing the behavior before you even have a chance to give your hand signal.
Simple, right?
There are a few important details that I would like to bring to your attention. First, make sure that you say your verbal command without using any body language. This means that, before you say your verbal command, make sure that you stand tall with your arms and hands at your side.
Most dogs are primarily visual, and they will pick up on any subtle body language, so if you nod your head every time you give the command “Down,” your dog might be responding to the nod rather than the verbal command.
Second, you must always say your verbal command before giving your hand signal. It won’t work if you say it at the same time, and this is a common mistake new trainers make.
Third, and this is a little more advanced, but my guess is you want to master this training method, or you wouldn’t have read this far. You will want to randomize your repetitions. And what I mean by “randomize” is this: Instead of doing the same thing over and over at the exact same pace, try to increase and decrease the length of time between repetitions.
For example, you could do one repetition, then move around a little bit to distract your dog, then do another repetition. This randomization will keep your dog attentive to the initial trigger, which is your verbal command.
STAGE 4:

The final stage is all about phasing out your hand signal. You can continue working with the hand signal if it’s something you want to use with your dog, but my bet is you want your dog to respond solely to your verbal command.
Before you can begin phasing out the hand signal, it’s important that you’ve practiced the stage three exercise enough times that your dog is starting to perform the behavior before you have a chance to give your hand signal. This is what tells you when your dog is ready.
Do you remember how we created a pattern in stage two when we started with a 3:1 ratio: three lures to one hand signal?
You’re going to use this same principle in this stage to phase out the hand signal. The purpose, if you recall, is to create a pattern so your dog will be successful. If your dog does something three times in a row, the dog will most likely do it a fourth time.
So begin by creating a pattern with a 3:1 ratio. Practice giving your command three times in a row, followed by a hand signal, and then reward your dog for doing the behavior.
But on the fourth repetition, you will want to give your verbal command without giving a hand signal. Then wait: If your dog performs the behavior, make sure you celebrate; give your dog a treat and lots of praise. Your dog has effectively responded to your verbal command.
But this doesn’t always work on the first try. Sometimes you might need to give a slight hint of the hand signal, such as slightly moving your shoulder or arm. But the goal is to get your dog to respond solely to your verbal command. So be sure this doesn’t become a habit.
Once you are successful with a 3:1 ratio, the only thing left is to gradually reduce this ratio to 2:1, 1:1, and eventually phase out the hand signals altogether.
CONCLUSION:
I understand this might seem overwhelming, especially if you’re just starting out. It’s like learning how to drive a car. If you remember, it was hard, and you had to pay attention to so many things, but now you can do it without even thinking about it.
The same is true with this training method. Once you’ve gone through all four stages with your dog, you’ll say to yourself, “Ah, that was easy!” And it is, but you have to start somewhere.
So choose a behavior you’d like to teach your dog—something simple such as sitting. Begin with stage one, and work your way from there. If you would like to see specific examples, such as how to lure your dog into a sit position or what my hand signal looks like, you are welcome to get my Good Dog Every Day Program that demonstrates how I work with my own dog.
I look forward to hearing about your success with this training method.
13

What’s your greatest dog training moment?
So this blog post is going to be a little different than most…
The reason why I created this website and the reason why I do what I do in the dog training world, is because I want dogs to live better and happier lives. And I wholeheartedly believe that positive reinforcement training is the best way to achieve this.
Unfortunately, not everybody agrees. So I thought, what if we have a page on this site that is full of dog training success stories. Stories about how our dog’s lives transformed, how they happier and better behaved as a result of training this way?
For example, when I first started training my dogs to do tricks, I thought my dogs were only doing it because I had a treat in my hand. But then I realized how much my dogs LOVED the training, how their tails were wagging in excitement the moment they saw me with a clicker or preparing training treats.
And how it brought me closer to my dogs than I ever could have imagined. I remember training my dog Chase to put her head on my lap while watching TV one day, and she was doing it for praise. I thought it was the coolest thing!
So I have a favor to ask you…
Would you mind sharing with me your story about how life changed as a result of training your dog with positive reinforcements? You can talk about a special moment, a funny story or anything you want.
I look forward to reading it! (Thanks in advance!)
3

How To Teach A Dog To Play Chess
Have you ever seen a dog in a movie doing something totally amazing, such as playing chess, and thought to yourself, Wow, I wish my dog could do that!?
Well, this is the same reaction that I had when I watched the movie Bingo as a kid. In this movie the dog Bingo plays chess with his owner. While watching it, I thought, How AWESOME would it be if I could teach my dog this trick?
So that’s what I did. And I’m going to share with you exactly how I did it!
(I must write a quick disclaimer here that your dog won’t actually be playing chess with you but rather picking up pawns from the chessboard and putting them in a box beside it. It’s still pretty cool, and if you film it the right way, with a little bit of acting, it can look real! Make sure that you send me that video once you’ve filmed it! :-))
OK, let’s get started! I’m going to share with you the step-by-step training video, and then I will explain each step in detail below.
Introduction
This trick is fairly advanced, so if you’ve never trained your dog to do anything before then this might not be the best one to start with. But it can be something to strive for because any dog can do it, no matter what level of trainer you are now.
This might be obvious, but you will need a chessboard to train your dog to perform this trick. Make sure that the pawns are not made from a toxic material (e.g., lead paint) because your dog will be handling them with his mouth.
You might also want to find a chessboard set that has larger-than-average pieces so that it’s easier for your dog to pick them up. Plus, you have to be very careful and make sure that your dog doesn’t chew or swallow the chess pieces. That would be very dangerous, so be cautious, and always put the chessboard away when you’re not training.
And one last important note: Please keep your training sessions short. Five to ten minutes is perfect. And ideally, three training sessions per day.
Milestones
The overall objective of this lesson is to teach your dog to pick up a pawn from the chessboard and put it in a box beside it.
To ensure that the training is successful, you will have to focus on small steps along the way. I call these steps “milestones” because these are the small obstacles you and your dog must overcome to get the final trick.
The first milestone is getting your dog to pick up the chess piece and put it in the box. This should be done without using the chessboard (as you can see in the video).
The second milestone is all about conditioning your dog to the chessboard and the sound of a chess piece falling onto it. This is VERY important because it will prevent your dog from becoming scared if he drops a chess piece later on (and he will most likely will, as my dog did many times in the beginning).
The third milestone is to combine #1 and #2—in other words, the dog picks the chess piece up off the chessboard and puts it in a small box.
The fourth milestone is adding some extra pieces from which your dog must distinguish the right piece to pick up. You’ll want to add a few more chess pieces and train your dog to pick up ONLY the chess piece that you have chosen.
And the final milestone is mixing up the chessboard, really challenging your dog, and testing how well he understands what you want.
Reminders
Here are a few important tips to remember before starting your sessions:
- Always click your clicker the moment the dog performs the step. A second too late or too soon will reinforce the wrong behavior.
- Always give your dog a treat (or any reinforcement) after you click your clicker—even if the timing of the click is wrong.
- Reinforce each step a few times before moving on to the following one, but try to limit each training session to three steps at a time. In other words, don’t move on too fast.
- Your dog might not follow the plan exactly as I described. You might find your dog doing all sorts of silly things, such as stepping on the chessboard, but it’s up to you to decide what you want to reinforce or ignore.
- Keep your training sessions very short; a five- or ten-minute session is perfect.
- At the end of the training session, store the box away so that your dog cannot play with it.
Milestone #1 – Placing Pawn in Box
The objective is to train your dog to pick up a chess piece and put it in a box (without the chessboard present).
To begin, I recommend that you choose one chess piece and stick with it for the duration of the training. For my dog I chose the black pawn because it was the easiest one for him to pick up because of its rounded head. I would advise against training your dog to pick up the king because if you film your dog performing the trick and playing chess later on, the dog’s move would seem unrealistic and go against the rules of chess because the king can only move one space.
Next, you will need a box for your dog to put the chess piece in. I used an old alarm clock box, so it doesn’t have to be fancy.
Here is the list of steps your dog will need to master to perform the trick:
- Look at chess piece.
2. Bring head closer to chess piece.
3. Sniff or touch chess piece.
4. Open mouth.
5. Bite chess piece.
6. Pick up chess piece with mouth.
7. Move head toward box (with chess piece in mouth).
8. Drop chess piece in box.
Because the dog does not need to move his entire body to perform this trick—only his head to drop the chess piece in the box—you can train your dog to perform this trick while he is lying down in front of you.
The first step will be to train the dog to pick up the chess piece in his mouth. Depending on your dog’s experience with picking things up in his mouth, you may need to spend a few sessions practicing this step before moving on.
Once you have trained your dog to pick up the chess piece, you can then start to incorporate dropping the chess piece into the box.
Tip: After you click your clicker, your dog will automatically let go of the chess piece to eat the treat. You can use this to your advantage by sliding the box below where your dog normally drops the chess piece.
Eventually, you will need to make a change and click ONLY if the chess piece lands inside the box. And once your dog figures that out, you’ll want to gradually move the box away from your dog to make it more challenging.
It is important in training your dog to move along to the next step but not to make it too easy. So you have to GRADUALLY make it harder for your dog, but not so hard that he can’t successfully perform the steps of the training.
For example, when you start moving the box away from your dog, you don’t want to move it an entire foot away; you’ll want to start with an inch. And if the chess piece doesn’t land inside, then wait and let your dog try again.
Note: At the end of all your training sessions, take your chosen chess piece and store it away. It is now a training tool and should only be used during training sessions.
Milestone #2 – Adapting to Sound
Now it’s time to acclimate your dog to the sound of a chess piece falling onto the chessboard.
I have incorporated this exercise into this lesson because I had an incident related to this topic happen with my own dog.
My dog had fully mastered this trick; then one day she accidentally dropped the chess piece on the board, which made a lot of noise and scared the heck out of her. After only this one experience, she was very reluctant to pick up the chess piece.
So it’s much better (and easier) to prevent your dog from becoming reluctant; simply conduct a few training sessions of dropping the chess piece on the board and then clicking your clicker.
Timing is crucial for this to work. Your dog must hear the sound FIRST and then hear the click, followed with a treat. Try to vary how long you have your dog take between dropping the chess piece. Sometimes wait a second before dropping it; sometimes wait five. This way, your dog won’t know exactly when you’re going to drop it.
Milestone #3 – Pick up Pawn From Box
OK, it’s finally time to get your dog to pick up the chess piece from the board and put it in the box.
This should be relatively easy if you’ve fully passed the first two milestones. The first milestone was really the most important, so if you are still unsure about your dog’s ability to pick up a chess piece and put it into a box a foot or two away, then you need to go back and practice some more.
Depending on your dog’s body type and height, you may need to position the chessboard on a small box or a table. As you can see from the video, I put my chessboard on a small box to make it easier for my dog to pick up the chess piece. This also helps prevent your dog from walking on the chessboard.
Once you’ve positioned your chessboard, choose the side that you want the box to be on. This will be the box’s permanent location until your dog has mastered the trick. (You can always change it later on, but for now just pick one side.)
Place one chess piece on the board and reward your dog for picking it up and placing it in the box. If your dog drops it, put it back in the middle of the board.
Tip: You can make it a little easier in the beginning by placing the chess piece closer to the edge of the chessboard where your dog is.
Milestone #4 – Pick up the Right Pawn
OK, let’s make this interesting! Let’s get your dog to start distinguishing between the chess piece that you’ve trained him to put in the box and other pieces that you put on the board.
A good reason why I encouraged you to use the black pawn while training your dog is that it remains easily identifiable when you start adding a whole bunch of white pieces to the chessboard.
So begin by placing one chess piece at the end of the chessboard opposite your dog. For example, put a white rook closer to you and the black pawn closer to your dog. This will make it easy for your dog to pick up the right one. Then you’ll want to gradually move the two pieces closer and closer.
If your dog picks up the wrong one, simply ignore the behavior and wait for him to pick up the right one. Your dog will eventually learn that a reward is ONLY given for picking up the correct piece.
A great advantage is that you’ve been training your dog with the same chess piece throughout the first three milestones, so your dog will have gotten used to the look and smell of it, and it shouldn’t be too hard to him to figure out which one to pick up.
Milestone #5 – Mix the Board
This last milestone is all about having fun with the trick. Challenge your dog (and yourself) by moving the pieces around and only rewarding your dog for picking up the right one.
Your goal should be to have at least five pieces other than the black pawn on the chessboard and to have your dog consistently pick up the right one. But the trick is to mix them up every time after the dog performs the trick.
This will definitely challenge your dog to think.
Final Thoughts
Have fun with this trick! I know that you’re going to have A LOT OF FUN while training your dog to do it, and perhaps you will share a video that shows your dog mastering the trick with me. If you put a link to your YouTube video in the comments below, I want to see it.
And maybe you can build upon this trick. You could train your dog to move the chess piece to a different location on the board to represent a chess move, followed with a BARK to represent “CHECKMATE!” That would be fantastic to see on video!
See you during the next lesson or at one of my dog training programs!
17

(a $47 value yours free!)[/optin_box_field][optin_box_field name=”paragraph”]PHA+RW50ZXIgeW91ciBpbmZvcm1hdGlvbiBiZWxvdyB0byBjbGFpbSB5b3VyIGZyZWUgY29weS48L3A+Cg==[/optin_box_field][optin_box_field name=”privacy”]Your information will never be shared with anyone.[/optin_box_field][optin_box_field name=”top_color”]undefined[/optin_box_field][optin_box_button type=”0″ button_below=”Y”]Send Me The eBook![/optin_box_button] [/optin_box]
Free Dog Training eBook – The Power of Positive Reinforcements
Have you ever wanted a dog so behaved and well-trained that people compliment on his awesomeness?
Well, this is exactly what happened to me when I started training my dog with Positive Reinforcements (this is a fancy name for reward-based, force-free training.)
Friends and family started to compliment me on how well-behaved my dog was, and how much they loved her because of all the amazing tricks she could now do. And once I taught my dog how to play chess (yes, I taught her that!), I just knew that this training method was the most powerful thing on earth.
And this is why I wrote this eBook that I’m giving away for free – the Power of Positive Reinforcements.
I want you and all dog owners around the world to experience this way of training. Because it simply works – some of the world’s greatest dogs were trained using this method. And best of all, dogs absolutely LOVE it! (And it even brings you closer to your dog!)
You’ll discover inside the eBook…
- Your dog’s deepest desire (page 23) – Without it, you will never be able to effectively train your dog to do anything. (Think of it like being paid for a job well done – you have to figure out what motivates your dog so you can get him to do … what you want him to do!)
- Training your dog to come (page 26) – This is the MOST important skill you can ever teach your dog … think about it, what would happen if your dog got loose near a busy street? You need a way to get your dog to come back to you!
- Walking on a loose leash (page 34) – It is a well-known fact that lack of exercise leads to destructive behaviors. And the easiest way to exercise your dog is to WALK your dog … but who wants to go on a walk while getting dragged down the road?
- Avoiding food possessiveness (page 39) – Perhaps you’ve already noticed that your dog doesn’t like having you near his food bowl … but did you know that there’s something you can do about it? In fact, you can even get your dog to LOVE you being near it.
- Grooming your dog (page 43) – Brushing and taking care of your dog’s coat is extremely important – but how many dogs hate it? The simple exercises in this section will help solve that problem forever!
- Obedience training (page 50) – Want your dog to listen to your “Sit”, “Down” or “Stand” command? Simply follow the step-by-step instruction in this chapter and you’ll get your very own Lassie!
- Teaching your dog tricks (page 58) – What would the world be without dog tricks? They entertain us and dogs absolutely LOVE doing them … so why not take a few minutes of your day and teach your dog some of the best dog tricks?
And this is just a small sample of what is inside the eBook. Again, I wrote this eBook because I wanted to spread the word about Positive Reinforcement training and how much of a difference it can make in your dog’s life.

(a $47 value yours free!)[/optin_box_field][optin_box_field name=”paragraph”]PHA+RW50ZXIgeW91ciBpbmZvcm1hdGlvbiBiZWxvdyB0byBjbGFpbSB5b3VyIGZyZWUgY29weS48L3A+Cg==[/optin_box_field][optin_box_field name=”privacy”]Your information will never be shared with anyone.[/optin_box_field][optin_box_field name=”top_color”]undefined[/optin_box_field][optin_box_button type=”0″ button_below=”Y”]Send Me The eBook![/optin_box_button] [/optin_box]
If you enjoyed reading this eBook, please share it with your friends by clicking the Facebook Like button located on the left hand side of the page.
The more we share this eBook, the more people will be able to train their dog using positive, force-free and reward-based training methods!
5

The Collar Grab Training Game
Last week I published three dog training tips to help you train your dog. These training tips are not meant to be full courses but rather “golden nuggets” of information.
One of them was about training your dog to come, and more specifically one technique that I discussed was the “Rocket Launch”. Where you have a friend hold your dog and you call your dog and run in the opposite direction to trigger your dog’s chasing instinct.
You can actually read more about the “Rocket Launch” technique by clicking here.
What I enjoy about publishing these dog training tips is the interaction that I get with other dog owners. I can read about their struggles and help them. And this is what happened; I received some interesting questions about a variety of subjects.
One question in particular was about training a dog to come close and being able to put a lead on.

So in response to Laura’s question, and anybody who might have the same issue, I’ve decided to take one of the lessons from my Walk in Harmony Game Plan and share it with you for free.
This training game is called “The Collar Grab Game”. And basically you want to condition your dog that great things will happen when you grab your dog’s collar.
Because here is the thing; most dogs learn over time that coming back to you (or their owner) is something to avoid because it leads to a loss of freedom.
Think of it from your dog’s perspective. If your dog is playing freely in a park, and it’s finally time to go home, what do you do? You call your dog to you, put the leash on your dog and go home.
But over time, your dog will learn this pattern. And you may already be experiencing some side effects of that with your dog starting to “ignore” your come command, or not fully coming all the way to you and staying a few feet away, or running away when you try to put on the leash.
So to counter-act this, you simply have to play “The Collar Grab Game”. Basically you take your dog’s collar, give your dog a treat, and then release the collar. Simple right?
Here is the video:
So when can you use this? You’d want to use this when practicing recalls; get in the habit of grabbing your dog’s collar whenever your dog gets to you. Of course sometimes put the leash on, and other times release your dog.
There’s times when I’m at the park and I purposefully practice this game with my dog. I would call my dog to me and then grab the collar, put the leash on, give her a treat and then let her go back to play.
So have fun! And let me know how it goes by writing a comment below. (Yes, I read them all.)
17

Fun, Effective Technique To Get Your Dog To Come … The Rocket Launch!
I want to tell you about something that is extremely important, something that could literally save your dog’s life one day … and something that is easier than cooking Popcorn!
What is it you ask? It’s teaching your dog to come after hearing his name. But you’d be surprised to know that most dogs have never been conditioned to respond to their name. Most people simply assume their dog know their name because “we” as humans do.
This exercise is great for teaching your dog to come to you after hearing his name. I remember teaching this to a friend a little while ago, and in a weekend their dog would come running to them like had just been selected on the “Price is Right”.
She did the exercise with her son. They would call their dog’s name and give a treat after he came to them. That’s it. But then they built upon the exercise, started creating distance between each other until they were in separate rooms. Then they even practiced on two different levels of the house – meaning one of them was upstairs and the other downstairs.
So if they could teach their dog to respond to his name in one weekend, surely you can too!
Make sure that you give your dog something that he values when he comes to you, most dog loves food but it could be other things like playing, petting and giving attention.
BUT I MUST WARN YOU …
Your dog’s name will become a conditioned cue to get your dog to come to you, meaning that if you use it uselessly around the house without giving your dog a reward, it will lose its effectiveness.
If you say “FIDO, GET OFF THE COUCH!” or “FIDO, DOWN!” or “FIDO, GO GET YOUR TOY” then the word “Fido” does not mean to come to you anymore, and you are using it to get your dog’s attention.
So what is the solution? There are three options:
- Do not use your dog’s name unless you want your dog coming to you.
- Train your dog to the command “COME” instead of his name.
- Use a nickname whenever you don’t want your dog to formally come to you..
Personally, I practice all three solutions with my dogs. I don’t use their names unless I want them to come to me, and they’re also conditioned to respond to the “COME” command, and I use little nicknames around the house for them.
Go ahead, give it a try with your dog! Seriously … just do it, it will work!
Power Quote: “Teaching your dog basic obedience skills is your responsibility as a dog owner, but teaching them can be lots of fun if you use Positive Reinforcements.” – Jean Cote
2

How To Motivate Your Dog To Do Anything You Want…
When I was a child, I remember going to a friend’s house, and his family had this incredible Border Collie as their family dog. This dog had so much energy, he always wanted to play and absolutely loved to play fetch. To me, this was the coolest thing I had ever seen!
One impressing thing that I remember, was my friend biking to the park and having his dog run behind him, without even needing to use a leash. Then they had lots of fun while playing fetch together for what seemed like an eternity.
This short yet very inspirational experience left me in “awe” and I desperately wanted a dog. But it wouldn’t be until 15 years later that I got my first Border Collie… I named her Chase because I wanted her to chase balls.
Once I brought Chase home as a puppy, I immediately noticed that she was extremely timid and scared of everything. I had to constantly reassure her that everything was going to be okay and that she was in good hands.
But one thing that I promised myself at the time, was that I would do everything possible to help Chase associate massive pleasure with toys.I did many different exercises with her, and today she absolutely loves toys … even more than treats!
So in this short e-mail, I will talk about the ways with which I accomplished this, so that you can have the same kind of success with your dog.
I think the most important thing that I did, was to make a BIG deal whenever Chase played with any of her toys. I literally cheered like I had won the lottery or been selected on the “Price is Right” whenever she started playing with her Kong, tennis ball or stuffed animal.
She quickly realized that playing with toys got her lots of attention from me, and so the behavior of playing with the toys grew and became a way of life for her.
Then… I made playing with the toys even more exciting! I triggered her chasing instincts by moving the toys on the floor so that she had to run after it to get it. I remember one time tying a rope to one of her plush toy and dragging it across the room for her to chase – it was so much fun!
But the key to this exercise … is that I never let her decide when the game was over. I would always end the game while my dog was highly engaged in playing with me. So that I knew next time we played together, she would put even more energy into it.
I would always end the game by saying “That’s it!” .. and run outside to changer her state of mind. This way she associated me taking the toy away as something positive and fun … going outside with dad!
Well, now it’s your turn! I guarantee that if you practice this simple exercise for a week that you will see a difference in your dog’s enthusiasm with playing with toys. Give it a try … It’ll only take 5 minutes!
Power Quote: “The quality of the relationship with your dog depends on the time and energy that you put into it.” – Jean Cote
6

Why Punishing My Dog Didn’t Work…
When I first started learning about dog training, I was totally overwhelmed by the vast amount of information available. It was so confusing, even the top dog trainers in the world disagreed with each other on which training method was better.
You’d have Caesar Millan on one hand who advocates the dominance theory, and then you’d also have the exact opposite with Karen Pryor who trains strictly with Positive Reinforcements…
So… Which one is right? And who should I listen to when training my dog?!
To be totally honest with you, I was confused. So I decided to go to my local dog training school and do what they told me. Their training methods were a mixture between the two; they would punish the dog for bad behaviors and reward the dog for good behaviors.
On the surface, this system seemed to work very well – my dogs were obedient. But one day, something strange happened…
I was at a local agility ring, and my dog Onyx (a Siberian Husky) was pulling on the leash very hard, as she wanted to go play with another dog. So I did as I had been told, and I yanked on the leash to correct my dog for the bad behavior. But I could tell that the yanking really hurt my dog, she was moving her tongue as if the yanking on the leash made her bite it.
And to make it worse, other people there were all staring at me like I did something wrong. So I began to question myself… “Did I do the right thing?”
I kept convincing myself that this was the proper response, because that’s what the trainers had told me to do when she pulled on the leash. But was it? Was there an alternative?
My world changed when I asked myself this question: “If I were a dog, how would I like to be trained?”
And my answer was eye-opening! Because I wouldn’t want to be trained with corrections like I was doing.
So I made the decision to learn how the experts in positive reinforcements training were able to train their dogs. And what I discovered was that you really don’t need to correct your dog, you simply need to build the good behaviors strongly enough that it becomes second nature to the dog.
And that’s what I’ve been doing ever since. So it is my hope with this e-mail that you will learn from my mistakes, and also learn a new way of training your dog … because in the end, I think what we really want as dog owners is to have a dog that is happy and behaves nicely. We can have both!
Power Quote: “Positive reinforcement training is in my opinion, the best way to build trust in the relationship with your dog.” – Jean Cote